Our highly trained technicians & Engineers (Design, Quality & Production) will be ensuring that the optimum performance is delivered through Uniflow servicing of valves. The team assigned will be doing their analysis and share the kind of damage & high level of work needed on that valve. And post client approval, they will do the subsequent re-fitting of spares and end-to-end servicing with proper testing as per the standards & requirements. If the datasheet is not available, then the sizing of the valve will be also re-evaluated to perform any change to Cv or trims.
We not only sell you a new valve but being a service company, we can tell you when new isn’t required, so send your valve of
| Sr.No. | Description of trouble | Probable cause | Possible Solution |
| 1 | Less than rated or no valve travel even though proper air pressure is applied to actuator diaphragm. | 1. No air signal or incorrect air signal to actuator | 1.Check the controller and correct. |
| 2. Air leakage through the tube wall or connections | 2.Check the piping system and repair. | ||
| 3.Rupture on the actuator diaphragm. | 3.Replace diaphragm. | ||
| 4. Dirt or foreign matters restricting rotor movement | 4.Disassemble valve, clean and polish trim parts. | ||
| 2 | Leakage at Body Joint. | 1.Improper Tightening of the Body-Bonnet Joint. | 1.Tighten the bolts in a consistent manner. |
| 2. Damage to the body and bonnet flange’s sealing surface. | 2.Repair the sealing surface of the body or bonnet where damage is observed. | ||
| 3. Gasket failure or metal sealing ring damage. | 3.Replace or replace the gasket or metal sealing ring. | ||
| 3 | Leakage around valve stem. | 1. Wear or damage on the packing. | 1.Replace packing. |
| 2. Extreme wear or damage on the valve stem. | 2.Replace valve stem. | ||
| 4 | Inadequate flow | 1.Improper plug adjustment | 1.Refer ‘ASSEMBLY OF VALVE’ section of the manual shared |
| 2.Malfunctioning valve positioner | 2.Bypass valve positioner and check valve operation with direct signal | ||
| 3.Service conditions exceeds trim design capacity | 3.Reconfirm service conditions and contact factory | ||
| 5 | Control valve hunting | 1.Input signal fluctuations | 1.Provide steady signal through controller |
| 2.Backlash error in moving parts | 2.Remove backlash | ||
| 3.Moisture in air line | 3.Provide dry air supply | ||
| 4.Improper tuning of controller | 4.Adjust the controller settings | ||
| 6 | Excessive noise | 1.Flashing or Cavitations | 1.To ensure that adequate care has been taken at design stage |
| 2.Loose supports | 2.Tighten the supports sufficiently | ||
| 3.Damaged trim assembly | 3.Replace the trim parts | ||
| 7 | Handwheel cannot be turned flexibly. | 1.Damage to the stem nut due to Dirt /Foreign Particle | 1.Replace the stem nut with a new one. |
| 2. Wear or perforation of the stem nut’s screw thread. | 2.Clean the debris from the screw thread of the stem nut. | ||
| 8 | Gland Leakage | 1. Packaging is not sufficiently tightened (Gland Nut Loose). | 1.Equally tighten the Gland nut. |
| 2. Worn out Gland Packing. | 2.Change the packing with a fresh one. | ||
| 9 | Seat Leakage | 1. Sealing Edge of Seat Damaged | 1.Replace Soft Seat. |
| 2. Valve Pressurized to High Pressure. | 2.Reduce Line pressure to rated Pressure. | ||
| 3. Fluid is abrasive & Eroding away Seal. | 3.Replace worn-out parts suitable with abrasive Media |
| 1 | Valve does not Open/ Close or Partial Open. | 1. Too much Tighten the packaging | 1.Slightly loosen the Gland nuts of and Evenly Tight it again. |
| 2. Shaft bend | 2.Replace or rectify the Shaft. | ||
| 3.Disc to shaft connection failed | 3.Repair Disc-Shaft Connection. | ||
| 4.Inadequate Air Supply to Actuator. | 4.Give Air Supply to Actuator as per Technical Specifications. | ||
| 5.No Input Signal to Positioner. | 5. Check 4-20 mA Input Signal. | ||
| 6.No Air Signal / Insufficient Air Signal to Actuator. | 6. Check the Air Regulator & Set Correct Pressure | ||
| 7.Air Leakage through Tubing. | 7. Repair Leakage from Tubing. | ||
| 8.Ruptured Actuator Diaphragm or Seals. | 8.Replace Actuator Diaphragm or Seals | ||
| 9.Foreign Material got Stuck up between Ball and Body. | 9.Open valve and clean the line for foreign particle Removal. | ||
| 2 | Gland Leakage | 1. Packaging is not sufficiently tightened (Gland Nut Loose). | 1.Equally tighten the Gland nut. |
| 2. Packing ring insufficiency. | 2. Add extra Gland packaging. | ||
| 3. Worn out Gland Packing. | 3.Replace the Gland packing with a fresh one. | ||
| 3 | Seat Leakage | 1. Sealing Edge of Seat Damaged | 1.Replace Soft Seat. |
| 2. Damage to Ball Sealing Surface | 2. Replace Ball. | ||
| 3. Valve Pressurized to High Pressure. | 3.Reduce Line pressure to rated Pressure. | ||
| 4. Fluid is abrasive & Eroding away Seal. | 4.Replace worn-out parts suitable with abrasive Media. | ||
| 4 | Opening Closing Excessive Thrust | 1. Extra Gland Packing Tightening. | 1. Retighten the Gland Nuts and over Finger Tight it Evenly. |
| 2. Foreign Object got stucked up between plug and Seat. | 2.Open the valve and clean the line for foreign particle Removal. | ||
| 5 | Leakage from End Cap | 1.Improper Tightening of the Body-End Joint. | 1.Tighten the bolts in a consistent manner. |
| 2.Gasket/ “O”-Ring failure | 2.Replace or replace the gasket / “O”-Ring. | ||
| 6 | Manual Override (MOR) not Functioning. | 1.Key not properly Inserted in MOR Shaft | 1.Properly Insert key in Keyway provided. |
| 2.Less MOR Torque to Operate. | 2.Replace MOR with Higher Torque. |
The valve is supplied for installation and can be installed in the pipeline without additional assembly or manufacturing work. Information on installing and commissioning the valve can be found in the valve Installation and Operation Manual.
| SR.No. | INSTALLATION & COMMISSIONING | ||||||||||||||
| 1 | We recommend that the installation and commissioning should be checked by an authorized person using the checklist. | ||||||||||||||
| 2 | Follow the safety instructions before installation, Maintenance or Removing the Valve from the Line. | ||||||||||||||
| 3 | It must be installed as per the standard practices outlined in the Maintenance and Installation Instructions. | ||||||||||||||
| 4 | It must be installed as per the standard practices outlined in the Maintenance and Installation Instructions. | ||||||||||||||
| SR.No. | Physical Location and Placement : Here are few Tips & recommendations | ||||||||||||||
| 1 | The valve must be accessible in all circumstances, with Sufficient space for the actuator, pneumatic connections, and any other components of the final control element. | ||||||||||||||
| 2 | There should be proper mechanisms in place to allow for manual proofing, to minimize airflow constraints and potential clogging, pneumatic piping to the actuator should be kept as short and straight as feasible | ||||||||||||||
| 3 | The valve should be placed in a low-vibration environment, since long or kinked pneumatic tubing might increase valve closing time. | ||||||||||||||
| 4 | If significant vibrations are expected, further care should be taken to protect pneumatic connections, or vibration must be minimized using suitable dampening elements. | ||||||||||||||
WARNING : Risk of malfunction due to incorrect selection or incorrect installation and operating conditions. Only use valves in safety-instrumented systems if the necessary conditions in the system are fulfilled.
Additional Information –
| SR.No. | Mechanical and Pneumatic Installation | ||||||||||||||
| 1 | If the process fluid contains solids that could clog the valve, a strainer must be added. | ||||||||||||||
| 2 | Blow Out pipelines to remove Pipe scale, Welding spatter, fine chips, and other foreign material. | ||||||||||||||
| 3 | Before installing the valve make sure that pipeline flow is in the same direction as arrow indication on the valve. | ||||||||||||||
| 4 | The actuator is placed on the valve and correctly inserted into the pipeline in accordance with the installation and operating instructions. Make Sure, the valve accessories are installed correctly. | ||||||||||||||
| 5 | Install the valve in accordance with established piping best practices. | ||||||||||||||
| 6 | Use self-centering Gasket for Installation of Valve in Line. | ||||||||||||||
| 7 | The Globe control valve’s fail-safe position (stem extends or retracts) is set correctly. | ||||||||||||||
| 8 | The Tightening torques (E.g., flanged joints) are measured and monitored. | ||||||||||||||
| 9 | The required flow direction is followed. The direction of flow is indicated by the arrow on the valve. | ||||||||||||||
| 10 | An Air Filter Regulator should be fitted in Air Line ahead of any instrument on the Valve | ||||||||||||||
| SR.No. | Selection | ||||||||||||||
| 1 | The Valve configuration & Material of Construction were selected to meet specific pressure, temperature, pressure drop and controlled fluid condition. Since the body and trim combinations are limited in their pressure drop and temperature Range | ||||||||||||||
| 2 | The materials used in the valves are appropriate for the process medium. | ||||||||||||||
| 3 | The entire Globe control valve assembly (valve, actuator, valve accessories with Tubing-Fitting) has been tested for compatibility for the specified application (pressure, temperature). | ||||||||||||||
| 4 | Based on the required transit time (Opening and Closing) and thrust, the actuator is properly sized. | ||||||||||||||
| SR.No. | Operation & maintenance (O & M)) | ||||||||||||||
| 1 | The flow through the valve is not obstructed, and the plug stem is not clogged. | ||||||||||||||
| 2 | The valve is only utilized in applications that fulfil the size requirements specified during the purchasing process. | ||||||||||||||
| 3 | Avoid personal Injury or damage to process system from sudden release of pressure of process fluid. | ||||||||||||||
| 4 | Disconnect all operating lines to the actuator that provide air pressure or control signals. | ||||||||||||||
| 5 | The End User should inspect the Earthing Facility and Valve Parts on a regular basis. | ||||||||||||||
| 6 | Only fully trained, authorized, and competent operational people do maintenance, and only original components are utilized for spare parts. regular basis. • Only fully trained, | ||||||||||||||
| 7 | Maintenance is performed as described in the section on servicing in the associated valve Installation, Operation and Maintenance Manual. | ||||||||||||||
| 8 | Equipment should be cleaned regular basis. | ||||||||||||||
| 9 | Cleaning the Valve Stem on a regular basis will keep dirt and grit out of the Packing. | ||||||||||||||
| 10 | Vary air pressure in air lines and fittings to the Actuator as per specification to determine the actual Travel Scale Indication. | ||||||||||||||
| 11 | Check for air leaks in all air lines and fittings to the Valve Actuator and Accessories | ||||||||||||||
| 12 | Ensure that the combined action of Valve Positioner and Valve provide the desired Valve Stem Movement. Also ensure the required fail-safe position of Valve. | ||||||||||||||
* The operator oversees the proof test interval and the scope of testing. The operator must create a test plan that specifies the proof tests and the time between them. We propose creating a checklist to summarize the proof test criteria. Periodic proof tests must be performed at the interval (or frequency) determined by a SIL verification calculation.
*To maintain the overall SIF’s necessary safety integrity, the proof tests must be conducted more frequently than (or as frequently as) indicated within the SIL verification calculation.
* The results of periodic proof tests and partial valve stroke tests (if any conducted) must be documented and evaluated on a regular basis.
NOTICE :
* Malfunction because of a non-observance of the required inspection requirements. To test the fail-safe action properly, the following requirements must be met:
* Regularly check the safety-instrumented function of the entire SIS loop. The test intervals are determined, for example on calculating each single SIS loop in a plant (PFDavg ).
Additional Information :
We recommend performing the proof tests based on a checklist.
| Visual inspection to avoid systematic failure | |||||||||||||||
| SR.No. | To avoid systematic failure, inspect the Control valve regularly. The frequency and the scope of the inspection lie within the operator’s responsibility. Take application-specific influences into account, such as: | ||||||||||||||
| 1 | Valve Plug stem obstruction | ||||||||||||||
| 2 | Corrosion problems (destruction primarily of metals due to chemical and physical processes) | ||||||||||||||
| 3 | Material fatigue and Process medium-induced wear | ||||||||||||||
| 4 | Abrasion (material removed by solids contained in the process medium) | ||||||||||||||
| 5 | Deposits of a medium size Aging (damage induced by light and heat to organic materials such as plastics and elastomers). | ||||||||||||||
| 6 | Chemical attack (organic materials, e.g., plastics or elastomer, which swell, leach out or decompose due to exposure to chemicals. | ||||||||||||||
NOTICE :
Record any faults in the valve and inform UNIFLOW of them in writing
| SR.No. | Safety-Related fail-safe action | ||||||||||||||
| 1 | Apply signal pressure to the actuator to allow the valve to travel all the way to its final position (completely open or closed). | ||||||||||||||
| 2 | Deactivate the signal pressure. As a result, the valve must move to its fail-safe position. | ||||||||||||||
| 3 | Verify that the valve reaches the required end position within the time limit. | ||||||||||||||
| 4 | Verify that the valve reaches the required end position within the time limit. | ||||||||||||||
Safety-Instrumented functions of valve accessories :
* Check the safety-instrumented function of valve accessories. Refer to the associated safety manuals of Valve Positioner, Solenoid valve etc.
* Only perform the work on the valve described in the Instruction, Operation and Maintenance Manual
NOTICE
The valve is supplied for installation and can be installed in the pipeline without additional assembly or manufacturing work. Information on installing and commissioning the valve can be found in the valve Installation and Operation Manual.
| SR.No. | INSTALLATION & COMMISSIONING | ||||||||||||||
| 1 | We recommend that the installation and commissioning should be checked by an authorized person using the checklist. | ||||||||||||||
| 2 | Follow the safety instructions before installation, Maintenance or Removing the Valve from the Line. | ||||||||||||||
| 3 | It must be installed as per the standard practices outlined in the Maintenance and Installation Instructions. | ||||||||||||||
| 4 | The environment must be checked to ensure that environmental conditions, do not exceed the ratings. | ||||||||||||||
| Physical Location and Placement : Here are few Tips & recommendations | |||||||||||||||
| 5 | The valve must be accessible in all circumstances, with Sufficient space for the actuator, pneumatic connections, and any other components of the final control element. | ||||||||||||||
| 6 | There should be proper mechanisms in place to allow for manual proofing, to minimize airflow constraints and potential clogging, pneumatic piping to the actuator should be kept as short and straight as feasible | ||||||||||||||
| 7 | The valve should be placed in a low-vibration environment, since long or kinked pneumatic tubing might increase valve closing time. | ||||||||||||||
| 8 | If significant vibrations are expected, further care should be taken to protect pneumatic connections, or vibration must be minimized using suitable dampening elements. | ||||||||||||||
WARNING:
Risk of malfunction due to incorrect selection or incorrect installation and operating conditions. Only use valves in safety-instrumented systems if the necessary conditions in the system are fulfilled.
| SR.No. | Mechanical and Pneumatic Installation | ||||||||||||||
| 1 | If the process fluid contains solids that could clog the valve, a strainer must be added. | ||||||||||||||
| 2 | Blow Out pipelines to remove Pipe scale, Welding spatter, fine chips, and other foreign material. | ||||||||||||||
| 3 | Before installing the valve make sure that pipeline flow is in the same direction as arrow indication on the valve. | ||||||||||||||
| 4 | The actuator is placed on the valve and correctly inserted into the pipeline in accordance with the installation and operating instructions. Make Sure, the valve accessories are installed correctly. | ||||||||||||||
| 5 | Install the valve in accordance with established piping best practices. | ||||||||||||||
| 6 | Use self-centering Gasket for Installation of Valve in Line. | ||||||||||||||
| 7 | The Globe control valve’s fail-safe position (stem extends or retracts) is set correctly. | ||||||||||||||
| 8 | The Tightening torques (E.g., flanged joints) are measured and monitored. | ||||||||||||||
| 9 | The required flow direction is followed. The direction of flow is indicated by the arrow on the valve. | ||||||||||||||
| 10 | An Air Filter Regulator should be fitted in Air Line ahead of any instrument on the Valve | ||||||||||||||
| SR.No. | Selection | ||||||||||||||
| 1 | The Valve configuration & Material of Construction were selected to meet specific pressure, temperature, pressure drop and controlled fluid condition. Since the body and trim combinations are limited in their pressure drop and temperature Range | ||||||||||||||
| 2 | The materials used in the valves are appropriate for the process medium. | ||||||||||||||
| 3 | The entire Globe control valve assembly (valve, actuator, valve accessories with Tubing-Fitting) has been tested for compatibility for the specified application (pressure, temperature). | ||||||||||||||
| 4 | Based on the required transit time (Opening and Closing) and thrust, the actuator is properly sized. | ||||||||||||||
| SR.No. | Operation & maintenance (O & M) |
| 1 | The flow through the valve is not obstructed, and the plug stem is not clogged. |
| 2 | The valve is only utilized in applications that fulfil the size requirements specified during the purchasing process. |
| 3 | Avoid personal Injury or damage to process system from sudden release of pressure of process fluid. |
| 4 | Disconnect all operating lines to the actuator that provide air pressure or control signals. |
| 5 | The End User should inspect the Earthing Facility and Valve Parts on a regular basis. |
| 6 | Only fully trained, authorized, and competent operational people do maintenance, and only original components are utilized for spare parts. regular basis. • Only fully trained, |
| 7 | Maintenance is performed as described in the section on servicing in the associated valve Installation, Operation and Maintenance Manual. |
| 8 | Equipment should be cleaned regular basis. |
| 9 | Cleaning the Valve Stem on a regular basis will keep dirt and grit out of the Packing. |
| 10 | Vary air pressure in air lines and fittings to the Actuator as per specification to determine the actual Travel Scale Indication. |
| 11 | Check for air leaks in all air lines and fittings to the Valve Actuator and Accessories |
| 12 | Ensure that the combined action of Valve Positioner and Valve provide the desired Valve Stem Movement. Also ensure the required fail-safe position of Valve. |
Additional Information:
Contact UNIFLOW’s After-Sales Service Department Concerning Any Work Not Described in Section on Servicing or Maintenance in The Associated Valve Documentation. (Mail on: info@uniflow.in)
| 1.Fail-safe action impaired due to incorrect repair and Maintenance. | ||||||||||
| 2.Service and repair work must only be performed by trained competent person. | ||||||||||
| 3.Use Genuine Parts while Servicing or Repairs Like Body Gaskets, Gland Packing, Diaphragm and Actuator Seals etc. (Applicable for 2 Way & 3 Way Globe Control Valves) | ||||||||||
| 3.Use Genuine Parts while Servicing or Repairs Like PTFE Bellow, Bellow Rope, Gland Packing, Diaphragm and Actuator Seals etc. (Applicable for PFA Lined Globe Valve) | ||||||||||
| 4.Do not perform unauthorized alteration in Valve. | ||||||||||
| 1. Fail-safe action impaired due to incorrect repair and Maintenance. | ||||||||||
| 2.Service and repair work must only be performed by trained competent person. | ||||||||||
| 3.Use Genuine Parts while Servicing or Repairs Like Soft Seat, Ball, Gland Packing, and Actuator Seals etc. | ||||||||||
| 4. Do not perform unauthorized alteration in Valve. |
We are excited to offer enhanced services through our newly inaugurated Service Unit in Vadodara! Our state-of-the-art facility is designed to provide top-quality services for valve repairs, maintenance, and testing, catering to industries across Gujarat and beyond.
This new facility is designed to deliver top-quality valve repair, maintenance, and testing services, ensuring that our clients experience minimal downtime and maximum operational efficiency. With our advanced technology and highly skilled professionals, we are committed to providing customized solutions that cater to a wide range of industries, including oil & gas, power, chemicals, and more.
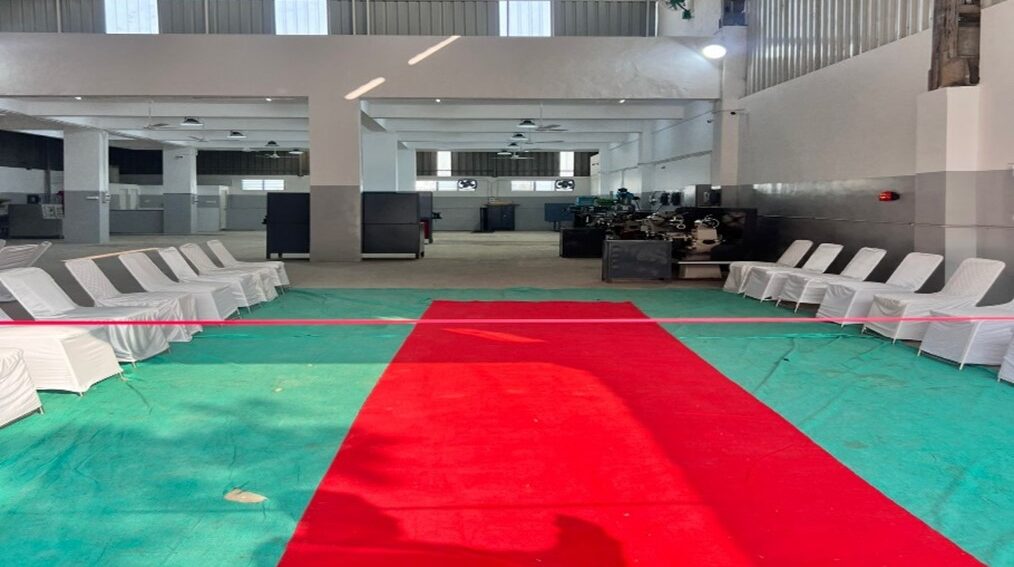
Our new facility is strategically located in Por Industrial Park, making it more accessible for local industries and ensuring that we can quickly respond to service requests.
Location: Plot no A-22, Por Industrial Park, Por, Vadodara, Gujarat- 391243
Date: January 18, 2025
Feel free to visit us for all your valve servicing needs!
Scan the QR Code for Directions:










For any complaints, feel free to reach out @ complaints@uniflow.in
Subscribe to our Newsletter & Event right now to be updated
Uniflow Controls Pvt. Ltd.
B Wing, 303, Mahavir Icon ,
Sector-15, CBD Belapur, Navi Mumbai
Maharashtra 400614, India
WhatsApp us